A floor can look dry within a day and still hold enough moisture underneath to warp subflooring, feed mold growth, and damage wall cavities. That is why structural drying after water damage is not the same as mopping up, running a few fans, and hoping the building airs out on its own. The visible water is only part of the problem. The bigger risk is the moisture you cannot see.
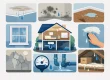
When water enters a home, office, or rental property, it moves fast. Drywall wicks it upward. Insulation traps it. Wood framing absorbs it. Flooring systems hold it between layers. In commercial spaces, water can migrate under baseboards, behind cabinetry, and across large floor areas long before surface materials show the full extent of the loss. If drying is delayed or incomplete, what starts as a water event often turns into a larger restoration project.
What structural drying after water damage actually means
Structural drying after water damage is the controlled process of removing excess moisture from building materials and the indoor environment until the affected structure returns to an acceptable dry standard. That includes more than standing water extraction. It also means reducing moisture in framing, drywall, flooring, trim, subfloors, and other structural components.
The process is technical because different materials dry at different rates. Hardwood behaves differently than concrete. Plaster dries differently than drywall. A crawl space responds differently than a second-floor bedroom with soaked carpet padding. Drying decisions have to match the material, the contamination level, the amount of water involved, and how long the building stayed wet.
This is also why experienced restoration teams rely on moisture mapping, equipment calculations, and ongoing readings instead of guesswork. If you only dry what feels damp to the touch, you will miss a lot.
Why speed matters more than most property owners realize
The first 24 to 48 hours matter because moisture damage keeps spreading after the leak, overflow, or flood source is stopped. Materials continue to absorb water. Humidity rises inside the building. Adhesives begin to fail. Finishes start to discolor. In the right conditions, microbial growth can begin quickly.
There is also a cost issue. Fast action can mean the difference between drying and saving materials versus tearing them out and replacing them. A wet hardwood floor may still be recoverable if drying starts early and the boards have not cupped beyond correction. Drywall exposed to clean water in a limited area may be salvageable in some cases. Wait too long, and replacement becomes more likely.
For landlords and commercial property managers, speed affects operations as much as repairs. Unresolved moisture can delay reoccupancy, interrupt tenants, create indoor air quality concerns, and complicate insurance documentation. Drying is not just about preservation. It is also about getting control of the loss.
The basic stages of a professional drying process
Every job is different, but the drying process usually follows a clear sequence.
1. Inspection and moisture mapping
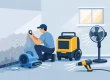
The first step is determining where the water traveled and what materials were affected. A professional team typically uses moisture meters, thermal imaging, and humidity readings to identify both obvious and hidden wet areas. This matters because water rarely stays where it first appears.
A kitchen supply line break may affect cabinets, toe kicks, adjacent walls, and the room below. A roof leak can wet insulation above the ceiling long before staining appears inside the occupied space. Without proper inspection, drying plans are often too small for the actual damage.
2. Water extraction
Before the structure can dry efficiently, as much liquid water as possible needs to be removed. Extraction is one of the most important steps because removing gallons of water directly is much faster than trying to evaporate all of it with air movement.
This stage may involve pumps, wet vacuums, weighted extraction tools for carpet, or specialty equipment for hard surfaces and floor assemblies. The more water removed upfront, the shorter and more controlled the drying process tends to be.
3. Controlled demolition when needed
Not every material can or should stay in place. It depends on the water source, the saturation level, and how the material responds. In some losses, baseboards are removed, small drywall sections are opened, or wet insulation is taken out to expose trapped moisture and allow proper airflow.
This is one of the areas where experience matters. Too little removal can trap water and slow drying. Too much removal increases repair costs unnecessarily. The right call is based on condition, not assumption.
4. Air movement and dehumidification
Once excess water is extracted and the affected area is prepared, drying equipment is set to create the right evaporation conditions. Air movers help increase airflow across wet surfaces. Dehumidifiers pull moisture from the air so evaporation can continue without saturating the indoor environment.
This is not a matter of placing random fans around a room. Equipment quantity, placement, and performance have to match the size of the affected area and the materials involved. Too much air without enough dehumidification can raise humidity and stall progress. Too little airflow leaves wet pockets behind.
5. Monitoring and adjustment
Drying is measured, not assumed. Over several days, technicians should take moisture readings and psychrometric data to confirm progress. Equipment may need to be repositioned as some areas dry faster than others.
Monitoring is what separates actual structural drying from simply renting equipment and waiting. Buildings often look normal before they are dry internally. The readings tell the real story.
What can go wrong with DIY drying
Homeowners often try to handle small water losses themselves, and sometimes that is reasonable for a very minor spill with no migration into walls or flooring. But many water events that seem manageable are not.
One common mistake is relying on household fans alone. Fans move air, but they do not remove moisture from the building. Without dehumidification, the air can stay too damp for effective drying. Another problem is stopping too soon. A room may feel dry at surface level while subfloors, sill plates, or wall cavities remain wet.
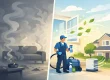
There is also the contamination question. Not all water is clean. Water from appliance failures, roof intrusion, sewer backups, storm flooding, or long-standing leaks may require a more cautious approach. In those cases, drying is only part of the job. Cleaning, removal, and sanitation may also be necessary.
Structural drying after water damage in different materials
Different building materials hold and release water in different ways, which affects both timeline and method.
Wood framing can often be dried successfully, but it needs close monitoring because it absorbs moisture deeply and may shrink or distort as it dries. Drywall is more variable. Lightly affected drywall from a clean water source may dry in place, but saturated drywall, especially if insulation is wet behind it, often needs partial removal. Concrete can hold a large amount of moisture and release it slowly, which is why flooring installation after a water event should never be rushed.
Insulation is another major factor. Fiberglass may lose effectiveness when wet, and cellulose can stay saturated and heavy. Carpet and pad need separate evaluation. In some clean water losses, the carpet may be saved while the pad is replaced. In more contaminated losses, broader removal may be necessary.
That is why drying timelines vary. Some projects stabilize in a few days. Others take longer due to material density, weather conditions, contamination, or how long the property stayed wet before help arrived.
The insurance side of drying
From an insurance standpoint, documentation matters. Moisture readings, photos, equipment logs, and drying records help show that the loss was addressed properly and that mitigation steps were taken to prevent additional damage.
Property owners should not assume every part of a claim will be straightforward. Coverage depends on the cause of loss, the policy, and whether the damage resulted from a sudden event or a long-term issue. Even so, prompt mitigation is usually expected. Delays can make a claim harder to support if the damage worsens over time.
For that reason, professional drying often helps beyond the physical work itself. It creates a documented process at a time when proof matters.
When to call for professional help
If water has affected more than a small, isolated surface area, if materials stayed wet for more than a few hours, or if the source involves contamination, professional help is the safer call. The same goes for water that reached hardwood floors, drywall, insulation, ceilings, crawl spaces, commercial suites, or multiple rooms.
A specialized restoration company such as Fire and Flood Experts approaches these situations with containment, drying strategy, and repair awareness in mind. That matters when the goal is not just to dry the building, but to avoid preventable demolition, mold growth, and repeat damage.
The best time to act is before the damage starts looking worse. If your property has taken on water, treat drying as a structural issue, not a housekeeping task. Fast, measured action protects the building you have today and the repair bill you do not want next month.